MESA Summer School 2015: Lecture 1
Table of Contents
Lecture 1: Going Beyond Inlists
This guide was written as part of the 2015 MESA summer school. It is
an introduction to MESA, with a particular focus on using
run_star_extras.f as well as MESA's binary capabilities. It assumes
you are using r7624 of MESA (which self-reports as r7623, so don't
worry about that).
If you're new to Fortran, we prepared a short document with some examples. Don't let yourself get hung up by the Fortran; quickly ask your classmates and the TAs for help!
There is a version of this document available with solutions. The git repository hosting this document contains the full source code used in each task, which you can see by looking at the appropriately named tag (i.e. part2-task2).
Part 1: Evolving a Single Star
The most common usage of MESA is doing single-star evolution. If you've used MESA before, or even just done the pre-school tutorial, much of this should be familiar.
Part 1a: Getting started
Each time you want to start a MESA project, you should make a new copy
of the star/work directory.
cp -r $MESA_DIR/star/work lecture1-single
In this case, we have prepared and provided a work directory for you. Download, unpack, and enter this work directory.
unzip lecture1-single.zip
cd lecture1-single
Task 1: Compile the provided work directory
This directory evolves a solar mass star from the (late) pre-main-sequence to hydrogen exhaustion. Confirm that you can compile it.
Part 1b: Changing output
MESA already knows how to output a tremendous amount of information. The two key file types are history files, which store the value of scalar quantities (e.g. mass, luminosity) at different timesteps and profile files which store the value of spatially varying quantities (e.g. density, pressure) at a single timestep.
The default output is set by the files
$MESA_DIR/star/defaults/history_columns.list
$MESA_DIR/star/defaults/profile_columns.list
In order to customize the output, you would copy these files to your
work directory. (In the lecture1-single working directory, we have
already performed this step.)
cp $MESA_DIR/star/defaults/history_columns.list .
cp $MESA_DIR/star/defaults/profile_columns.list .
Then, open up history_columns.list or profile_columns.list in a
text editor and comment/uncomment any lines to add/remove the columns
of interest ('!' is the comment character.)
You can use run_star_extras.f to define your own history and/or
profile columns. This capability is covered on the MESA website; we
will not cover it today.
Task 2: Add some output
Before distributing this directory, I ran MESA, so there is already
some output here. Look at LOGS/history.data to see what was
included. For our later exercises, we will want to know the radius
(in solar units) and the central mass fraction of hydrogen. Add these
quantities to your output. Run MESA and check that the data you want
were output.
Part 1c: Changing inlists
MESA/star has three inlist sections. Each section each contains the options for a different aspect of MESA.
- star_job
- options for the program that evolves the star
- controls
- options for the MESA star module
- pgstar
- options for on-screen plotting
The distinction between star_job and controls can be a little
subtle. We won't discuss pgstar in the lecture, but Frank will this
afternoon.
star_job contains options that answer questions like:
- how should MESA obtain a the initial model?
- are there any changes MESA should make to the initial model?
- what microphysics data should MESA read?
- where should MESA store its output?
controls contains options that answer questions like:
- when should MESA stop evolving the model?
- which angular momentum transport processes should MESA consider?
- what numerical tolerances should MESA's solvers use?
MESA's many inlist options are documented in the files
$MESA_DIR/star/defaults/star_job.defaults$MESA_DIR/star/defaults/controls.defaults$MESA_DIR/star/defaults/pgstar.defaults
They are roughly sorted into groups of related options. When you're searching for an option, see if it seems to match any of the section headings and then look there first. If that fails, try searching for some keywords.
Task 3: Change the stopping condition
Let's change the stopping condition and evolve until the luminosity is twice the solar luminosity. You will need to look up the necessary option and edit your inlist. This condition will occur later than the previous stopping condition, so don't start a new run; restart from the end of your last run.
Part 2: Using Run Star Extras
To activate run_star_extras.f, navigate to the lecture1-single/src
directory and open run_star_extras.f in your text editor of choice.
The stock version of run_star_extras.f is quite boring. It
"includes" another file which holds the default set of routines.
include 'standard_run_star_extras.inc'
The routines included in this file are the ones we will want to customize. Because we want these modifications to apply only to this working copy of MESA, and not to MESA as a whole, we want to replace this include statement with the contents of the included file.
Delete the aforementioned include line and insert the contents of
$MESA_DIR/include/standard_run_star_extras.inc. (The command to
insert the contents of a file in emacs is C-x i <filename>, vim :r
<filename>, or you can just copy and paste.)
Before we make any changes, we should check that the code compiles.
cd ..
./mk
If it doesn't compile, double check that you cleanly inserted the file and removed the include line.
The two most important things that one needs to know in order to use
run_star_extras.f effectively are (1) the control flow of a MESA run
and (2) the contents of the star_info structure.
The different run_star_extras.f routines get called at different
points during MESA execution. Here is a high-level overview of a MESA
run, written in Fortran-ish pseudocode.
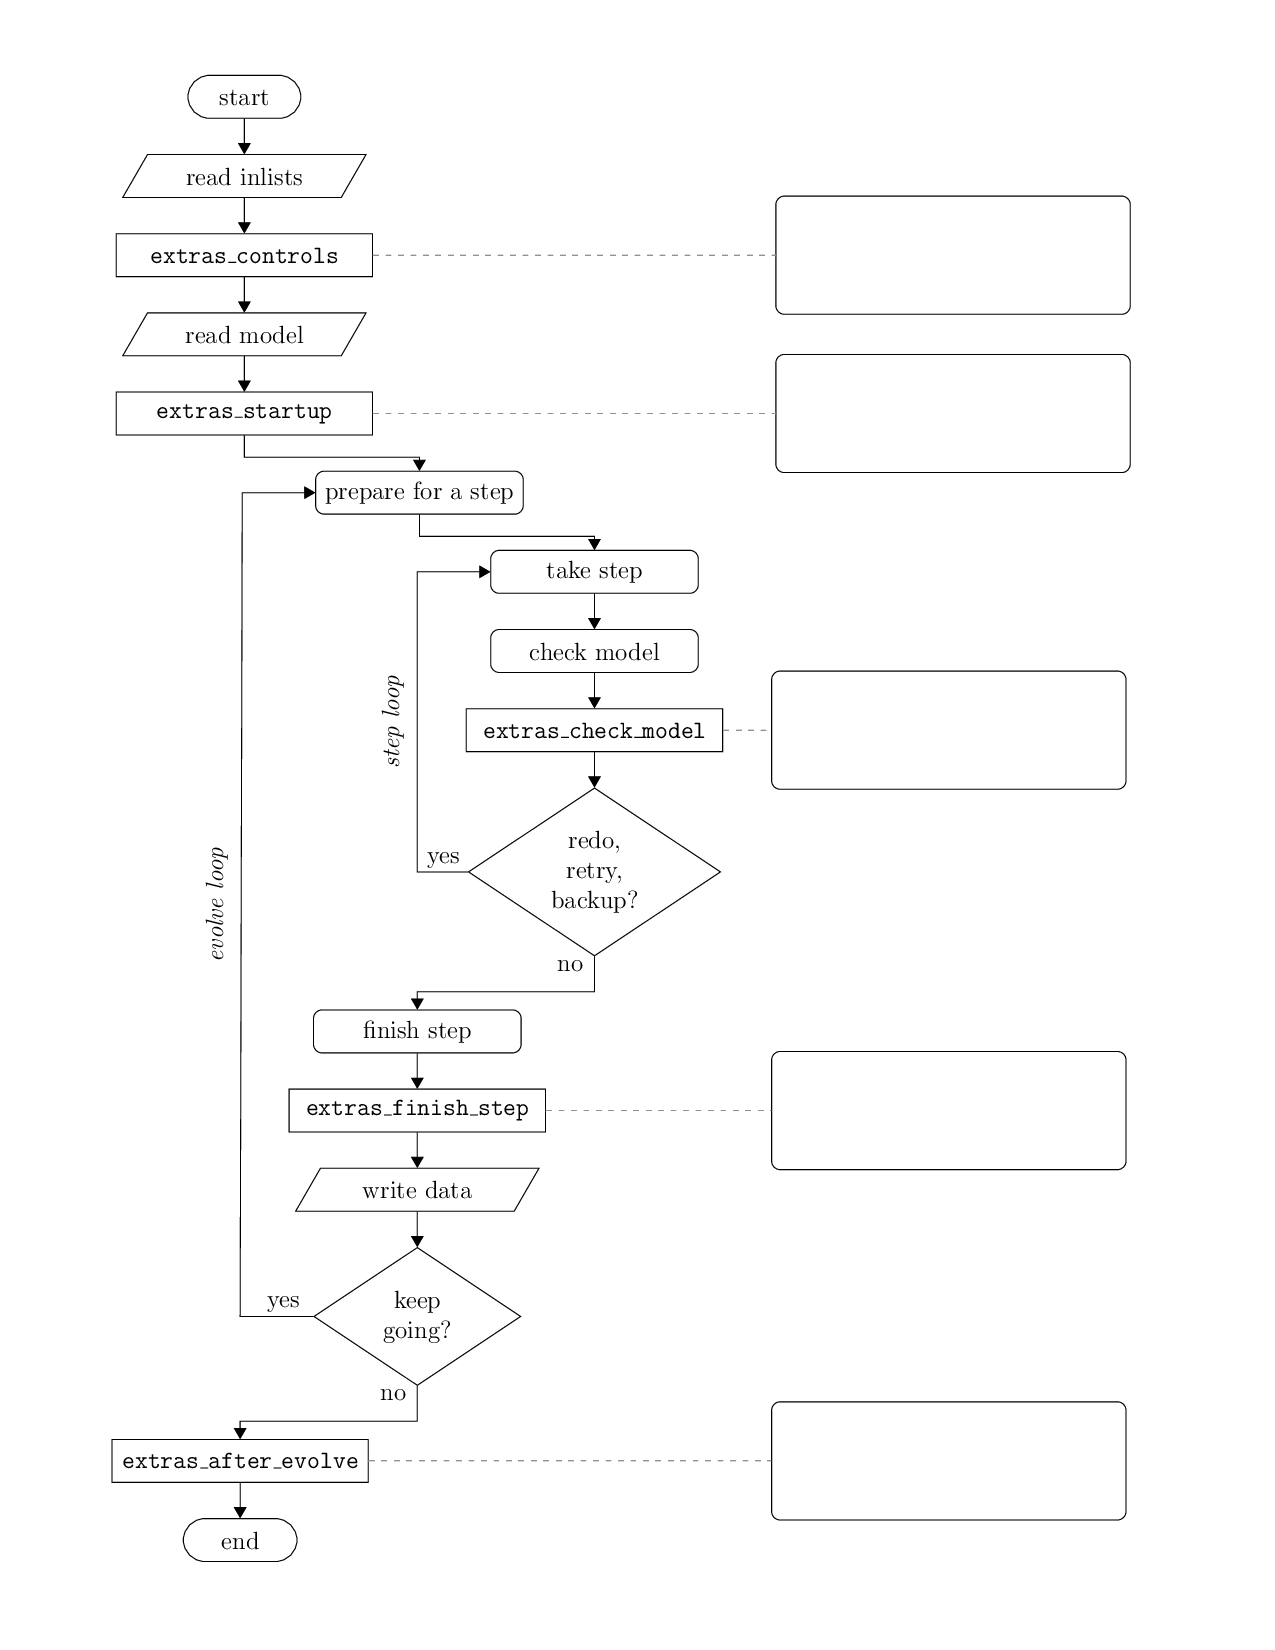
subroutine run1_star(...)

   ! star is initialized here

   ! before evolve loop calls:
   !   extras_controls
   !   extras_startup
   call before_evolve_loop(...)

   ! evolve one step per loop
   evolve_loop: do while(continue_evolve_loop)

      call before_step_loop(...)

      step_loop: do ! may need to repeat this loop

         if (stop_is_requested(s)) then
            continue_evolve_loop = .false.
            result = terminate
            exit
         end if

         result = star_evolve_step(...)
         if (result == keep_going) result = star_check_model(...)
         if (result == keep_going) result = extras_check_model(...)
         if (result == keep_going) result = star_pick_next_timestep(...)
         if (result == keep_going) exit step_loop

         ! redo, retry, or backup must be done inside the step_loop

         if (result == redo) then
            result = star_prepare_to_redo(...)
         end if
         if (result == retry) then
            result = star_prepare_to_retry(...)
         end if
         if (result == backup) then
            result = star_do1_backup(...)
            just_did_backup = .true.
         else
            just_did_backup = .false.
         end if
         if (result == terminate) then
            continue_evolve_loop = .false.
            exit step_loop
         end if

      end do step_loop

      ! once we get here, the only options are keep_going or terminate.

      ! after_step_loop calls:
      !   extras_finish_step
      call after_step_loop(...)

      if (result /= keep_going) then
         exit evolve_loop
      end if

      ! write out data
      !
      ! do_saves calls:
      !   how_many_extra_history_columns
      !   data_for_extra_history_columns
      !   how_many_extra_profile_columns
      !   data_for_extra_profile_columns
      call do_saves(...)

   end do evolve_loop

   ! after_evolve_loop calls:
   !   extras_after_evolve
   call after_evolve_loop(...)

end subroutine run1_star
In even more distilled terms, here is a flowchart summarizing this.
The star_info structure contains all the information about the star
that is being evolved. By convention, the variable name s is used
throughout run_star_extras.f to refer to this structure. In
Fortran, the percent (%) operator is used to access the components of
the structure. (So you can read s% x = 3 in the same way that you
would read s.x = 3 in C.)
The star_info structure contains the stellar model itself (i.e.,
zoning information, thermodynamic profile, composition profile).
These components are listed in the file
$MESA_DIR/star/public/star_data.inc. In addition, star_info
contains the values for the parameters that you set in your controls
inlist (i.e., initial_mass, xa_central_lower_limit). Recall that
the list of controls is located in $MESA_DIR/star/defaults/controls.defaults.
There is one set of controls that will prove useful time and time
again when using run_star_extras.f and that is x_ctrl,
x_integer_ctrl, and x_logical_ctrl. These are arrays (of length
100 by default) of double precision, integer, and boolean values. You
can set the elements in your inlists
&controls
  x_ctrl(1) = 3.14
  x_ctrl(2) = 2.78
  x_integer_ctrl(1) = 42
  x_logical_ctrl(1) = .true.
/ ! end of controls inlist
and access them later on as part of the star structure (i.e., s%
x_ctrl(1), etc.).
Part 2a: Monitoring your models
Task 0 (Example): Add a stopping condition based on radius
Suppose I want to stop when the star reaches a given radius. I look
in controls.defaults and such a condition doesn't seem to exist.
How do I do this?
First, look at how the routines in run_star_extras.f fit into a MESA
run. To decide whether to terminate, I want to check the value of the
radius after each step. Thus, I want the subroutine that is called
after each step, which is extras_finish_step.
Now, I need to figure out how to access the stellar radius. I open up
star/public/star_data.inc and start looking around. If I search for
the word radius, I quickly see that MESA says "r(k) is radius at outer
edge of cell k". (In MESA, the outermost zone is at k=1 and the
innermost zone is at k=s% nz.) Therefore, the radius of the star is
s% r(1).
MESA uses cgs units unless otherwise noted. The most common non-cgs
units are solar units. MESA defines its constants in
$MESA_DIR/const/public/const_def.f. Since the run_star_extras
module includes the line use const_def, we will be able to access
these values. Using the built in constants lets us make sure we're
using exactly the same definitions as MESA. The constant with the
value of the solar radius (in cm) is named Rsun.
! returns either keep_going or terminate.
! note: cannot request retry or backup; extras_check_model can do that.
integer function extras_finish_step(id, id_extra)
   integer, intent(in) :: id, id_extra
   integer :: ierr
   type (star_info), pointer :: s
   ierr = 0
   call star_ptr(id, s, ierr)
   if (ierr /= 0) return
   extras_finish_step = keep_going
   call store_extra_info(s)

   ! stop when the star grows larger than 1.2x solar radii
   if (s% r(1) > 1.2 * Rsun) extras_finish_step = terminate

   ! to save a profile,
      ! s% need_to_save_profiles_now = .true.
   ! to update the star log,
      ! s% need_to_update_history_now = .true.

   ! see extras_check_model for information about custom termination codes
   ! by default, indicate where (in the code) MESA terminated
   if (extras_finish_step == terminate) s% termination_code = t_extras_finish_step
end function extras_finish_step
Now, recompile your working directory
./mk
You will need to do this step each and every time you edit
run_star_extras.f.
Edit your inlist_project and comment out the luminosity-based
stopping condition we added earlier. We won't use it again.
Now start the model again from the beginning
./rn
This run should halt around step 58.
Task 1: Find the minimum radius
As the model evolved onto the main sequence, its radius decreased. As it evolved along the main sequence, its radius increased. Use run_star_extras to find the minimum radius. At the end of the run, print this minimum radius (in solar radii).
You can receive valuable MESA bonus points if your routine works even
if you do a restart (e.g., ./re x050).
Task 2: Stop when the star expands
The inlist in Task 1 stopped at hydrogen exhaustion. Instead, stop when the radius of the star exceeds some multiple of the minimum radius. Allow the user to specify this value in the inlist. For this example, input 2.0 as the multiple.
You can receive valuable MESA bonus points if your routine stops when the radius of the star is a user-specified multiple of the minimum radius. (Define is to be within a one part in a million.)
Part 2b: Changing controls on-the-fly
Recall that star_info contains the values for the parameters that
you set in your controls inlist. That also means that you can set
the value of these parameters by modifying the star_info structure.
Since run_star_extras gives us hooks to access to the star_info at
each step, that means we can modify parameters as the run proceeds.
This often saves us the hassle of stopping, saving a model, editing
the inlist, and restarting.
Task 3: Turn on mass loss when the star reaches 2 Rsun
Imagine that the star is in a close binary. As it expands, it might
fill its Roche lobe and begin transferring mass. Instead of stopping,
when the star reaches two solar radii, use run_star_extras to turn
on mass loss (at a rate of 1.5e-9 Msun/yr).
Use your inlists to stop when the mass of the star falls to 0.9 Msun.
You can receive valuable MESA bonus points if you use your inlist to tell MESA to only allow the mass to change by a fractional part of 0.001 in each timestep.
Part 2c: Changing input physics
MESA provides hooks to override its built-in physics routines. These are referred to as "other" routines. There are two main steps needed to take advantage of this functionality: (1) writing the other routine and (2) instructing MESA to use this routine.
Navigate to $MESA_DIR/star/other, where you will see a set of files
named with the pattern other_*.f. In general, find the one
corresponding to the physics (or numerics) that you want to alter.
Open it up and read through it. Many of the files contain comments
and examples.
Note that we do not want to directly edit these files. Instead we
want to copy the template routine into our copy of run_star_extras.f
and then further modify it there. The template routines are named
either null_other_* or default_other_*.
In this example, we will focus on other_wind.f. Open up this file.
Copy the subroutine null_other_wind and paste it into your
run_star_extras.f. It should be at the same "level" as the other
subroutines in that file (that is, contained within the
run_star_extras module.). Rename it to lecture1_other_wind.
subroutine lecture1_other_wind(id, Lsurf, Msurf, Rsurf, Tsurf, w, ierr)
   use star_def
   integer, intent(in) :: id
   real(dp), intent(in) :: Lsurf, Msurf, Rsurf, Tsurf ! surface values (cgs)
   ! NOTE: surface is outermost cell. not necessarily at photosphere.
   ! NOTE: don't assume that vars are set at this point.
   ! so if you want values other than those given as args,
   ! you should use values from s% xh(:,:) and s% xa(:,:) only.
   ! rather than things like s% Teff or s% lnT(:) which have not been set yet.
   real(dp), intent(out) :: w ! wind in units of Msun/year (value is >= 0)
   integer, intent(out) :: ierr
   w = 0
   ierr = 0
end subroutine lecture1_other_wind
If you read the comments in other_wind.f (and you should), you can
see that the file tells us how to have MESA use our other_* routine.
Perform these steps (hint: you will need to edit both your in
run_star_extras.f and your inlists).
Task 4: Add a wind that depends on the radius
Activating mass loss once we reach a certain radius can be thought of
as using a radius-dependent wind prescription. Use the other_wind
hook to implement such a prescription and redo Task 3 using this
approach. (Make sure to comment out or remove the code that you
previously used to switch on mass loss.)
You can receive valuable MESA bonus points if your routine allows for a user-specified radius and mass loss rate.
Part 3: Evolving Binary Stars
The binary capabilities have been a major focus of MESA development in recent years.
Each time you want to start a MESA binary project, you should make a new copy of the binary/work directory.
cp -r $MESA_DIR/binary/work lecture1-binary
In this case, we have prepared and provided a work directory for you. Download, unpack, and enter this work directory.
unzip lecture1-binary.zip
cd lecture1-binary
The contents of the binary/work directory should look similar to a
standard star work directory, only doubled. There are now two inlists
(called inlist1 and inlist2) and two LOGS directories (called
LOGS1 and LOGS2).
The file inlist_project now contains the binary namelists
&binary_job and &binary_controls. These have analogous roles to
the &star_job and &controls namelists in a regular star/work
directory.
There are only a few possible controls in &binary_job, which are
documented in $MESA_DIR/binary/defaults/binary_job.defaults. This is
where you specify the inlists for each of the stellar models (via
inlist_names). Those files will be regular inlists for MESA/star,
where you can load/save models, change nuclear networks, do what
you're used to doing in MESA/star. You also choose whether to evolve
both stars (one star could be a point mass) and whether to follow
Roche lobe overflow. In this example, our binary_job namelist is
&binary_job

  ! each star has its own inlists
    inlist_names(1) = 'inlist1'
    inlist_names(2) = 'inlist2'

  ! in this example, we will treat star 2 as a point mass
    evolve_both_stars = .false.

/ ! end of binary_job namelist
The options in the &binary_controls inlists, which may be more
unfamiliar, are documented in
$MESA_DIR/binary/defaults/binary_controls.defaults. Most
importantly, this is where we set the initial orbit of the binary and
determine how mass and angular momentum are transferred.
In this example, our binary_controls namelist is
&binary_controls

  ! in inlist1, we will load a saved model for star1

  ! since star2 is a point mass, we need to set its mass (in Msun)
    m2 = 1.4

  ! we need to set the initial orbital properties of the binary
    initial_period_in_days = -1  ! -1 means ignore this

  ! use implicit Roche lobe overflow
    max_tries_to_achieve = 10

  ! transfer efficiency controls
    limit_retention_by_mdot_edd = .false.

  ! turn off magnetic braking in this example
    do_jdot_mb = .false.

/ ! end of binary_controls namelist
Again, binary behaves much like star, so before you can run you
must issue the command
./mk
Task 1: Evolve a binary (one star + point mass)
The stated motivation for our experimentation with single star mass loss was that the star was overflowing its Roche lobe. Using the binary module, we can follow this more self-consistently.
Use the binary_controls inlist to choose the initial semi-major axis
of your binary system to be 6 Rsun. With this separation, the star
will overfill its Roche lobe when it reaches a radius of approximately
2 Rsun, the radius we were using earlier.
Task 2: Evolve a binary (two stars)
The binary module can also simultaneously evolve two stars. We have
provided a model 0.8M_at_ZAMS.mod. Change from having a point mass
as star 2 to using this saved model as star 2. Start this binary
system with an initial orbital period of 16 hours.